Two Posts in one: Stitch-it Saturday and a Photo-Shoot
Hey guys! I know I said we would post these things yesterday, but we had a sewing meeting thingy to go to (not sure what to call it) and I had to go the Violin shop to see how much it would cost to get it serviced. Anywho, we were home all day today, so therefore, today is the perfect day to post it! (BTW Pic Monkey was not working for some strange reason, so these photos are NOT watermarked.)
Today's Stitch-it Saturday: Doll Quilt
I know what you're all thinking, "But wait, shouldn't that be easy?" Yeah. That's what I thought too. However, this quilt is tricky because there are several ways you can make it, and it uses a different technique.
This is the finished product (minus quilting). I made this for Marie-Grace since she didn't have any bedding.
First, you have to pick your fabrics. I had a pack of charm squares from Moda (4"x4" squares), so I used those. You also have to pick a backing.
You then pair up the squares. You'll want to pair up different colors depending on what pattern you choose. There are no wrong ways to make this quilt! For instance, here I picked yellow and white, and paired them up with right sides facing each other. Lay a ruler diagonally across the fabric.
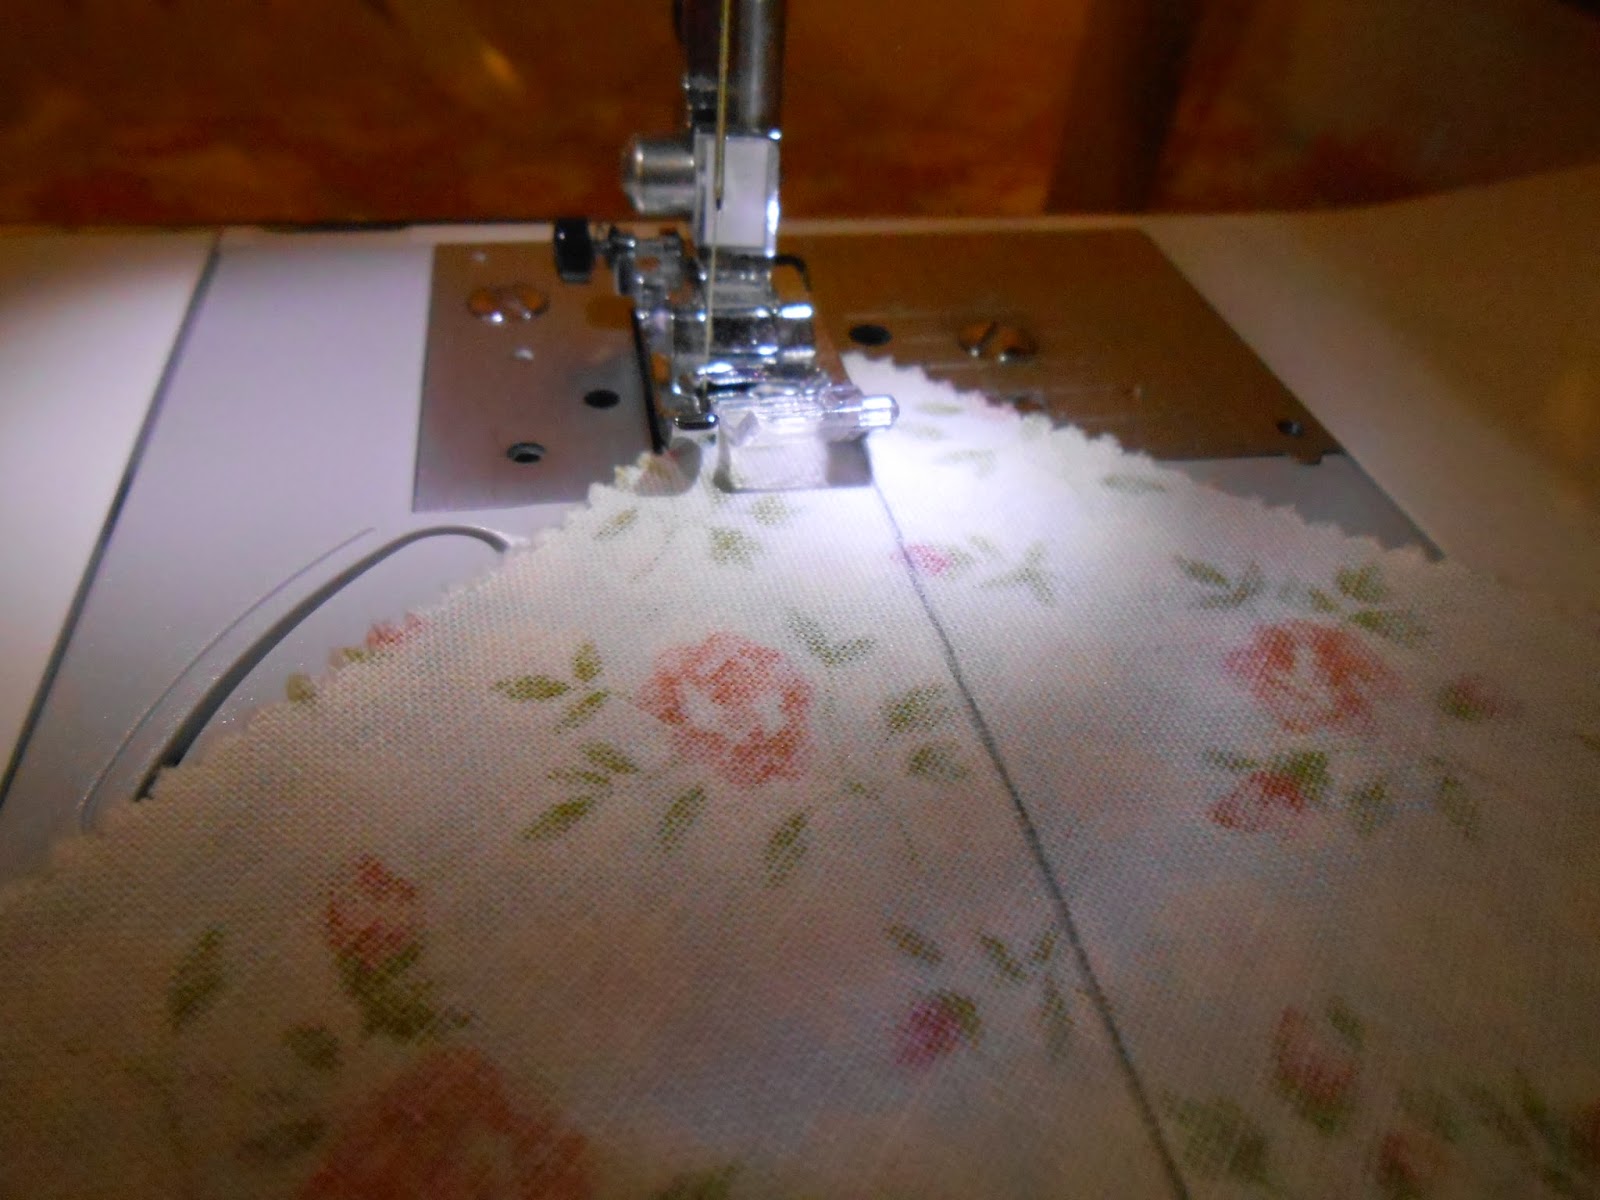
Draw a line with a PENCIL (not a pen; pens stain the fabric), tracing along the edge of the ruler.
Example
You then will do that for each pair of squares.
Once you've traced, sew with a quarter inch seam on either side of the line. I used a quarter-inch-foot, so all I had to do was align the foot with the line, flip it over after sewing, and then align the other sign. I was in a hurry when I made this quilt, so I just used my mom's machine, but if you have a vintage sewing machine or one without a quarter-inch-foot, you will want to measure from the foot where that seam would be.
Here is what the stitch should look like, just on both sides of the line.
You will also want to cut the excess thread after you're done sewing this part.
(Sorry these photos are sideways) If you sewed your pieces in a chain, you'll want to separate them from each other.
After you've sewn on either side of the line, align a clear ruler with the line you traced.
Then cut along that line, creating two squares made of triangles. If using a rotary cutter, be sure to apply enough pressure to the cutter that you won't slip and cut the seams. If using a pair of scissors, be sure to cut as straight as possible.
This is an example of what the square will look like. These triangles are called half square triangles. You can also just cut each square in half in the first place, but that can become tedious because you then have to sew each triangle to another triangle.
Do this step with all of the rest of the pairs.
Then, iron the squares, pressing the seam to one side. I used steam so that the squares would stay flat.
(Sorry about the camera strap in the picture :))
Iron all of the squares.
The hardest part is done! Now, all you have to do is decide what kind of pattern you want to create with the colors in your quilt.
You could do flying geese...
Or a stripe of sorts...
Or arrange the squares in a totally random pattern, it's your choice!!
I chose to create a diamond pattern.
If you have extra pieces, you can make a matching pillow to go with the quilt.
After you decide what pattern you want to use, you sew each row, pairing up pieces once again.
You then iron the row.
From there, you do the same for each row.
You can then sew each of your completed rows together. Make sure that each row is sewed correctly, because if not, your pattern can be screwed up.
Be sure to iron!
Since I did the diamond pattern, the "intersection" of the pieces looked like this.
After the quilt top is sewn together, choose a border. Try to coordinate colors, if you do so, your quilt will match a lot better.
Cut the borders to whatever width you desire, and sew them on, doing the sides opposite from each other first, and then the sides adjacent to those.
Your quilt top is finished!! Next week, I'll show how to bind your quilt. :)
So what did you think of the first Stitch-It Saturday? Here is the second part, the extremely short photo shoot of Molly in a shirt I made for her :) Sorry that most of the pictures are sideways, I wasn't able to edit them so ya know ;)
Thanks guys, have a wonderful week!
~<3Ginny~


Wow, that quilt is really cute! =D Molly looks gorgeous, also ;)
ReplyDelete~Maddie
Thank you so much Maddie!!
Delete~<3Ginny~
Super cute! If I only knew how to use a sewing machine. xD
ReplyDeleteAnd the photos are adorable! Totally gorgeous! =D
~Adaline
XD yeah that may help :) Thank you so much Adaline!!
Delete~<3Ginny~
Love it! The quilt is beautiful and I can't wait to see more of stitch it saturday! And I love the photos!
ReplyDeleteEmily<3
Thank you Emily!!
Delete~<3Ginny~
Woah! That quilt is amazing!! I love the way it turned out! I also love that shirt you made! It is so cute!! :D
ReplyDelete~ Mint
Thank you so much Mint!! :)
Delete~<3Ginny~
The quilt is really cute and looks quite comfy! I want to try and make this some time. Molly looks adorable in that top! I like the floral pattern of it pared with the lace.
ReplyDelete- Zoë
Thank you so much Zoe!!
Delete~<3Ginny~
That is sooo cute! I will definitely have to try that sometime! :)
ReplyDeleteThanks! I was surprised how well it turned out :)
Delete~<3Ginny~
The last photo of Molly looks so cool sideways! I need to make a doll quilt, so I'll use this tutorial. Thanks Ginny!
ReplyDeleteOh thanks actually accidental, but I'm glad you like it!! No prob, I'm very glad it helped!!
Delete~<3Ginny~